Sculptgel and Third Degree are both great silicone based materials which can be used directly on the skin to create three dimesional makeup effects for fun, Halloween, low budget movies or to create work for a portfolio. This instructable shows you a step by step makeup of how this great material can be used. No need for sculpting or moulding, no latex allergies and no mess!
You may also want to take a look at the following related posts:
- Must Have Gadgets for Men
- Top Girly Gadget Gifts for Girly Girls Valentine Days
- Top 10 Home Theater A/V Receivers
- Best 7 Midrange AV Receivers 2011
- Extra Features in Most Wanted Gadgets 2011
- Best Valentine’s Day Gadgets For Valentine Greetings
- Top iPad Accessories for Valentine Gifts
- Unusual and Creative Gadgets Gifts for Valentine Days 2011
- Creative and Unusual Solar Gadgets
- Most Creative Ways To ReUse Old Gadgets
- Super Creative Healthcare Gadgets
- Most Wanted Gadgets For Valentine Day
- What’s The Most Wanted Gadgets And Most Favourite
Two-part platinum silicone pastes may sound technical and off putting to some, but these materials are very simple to use. This article aims to show you a simple method for using Sculpt Gel.
There are similar materials such as Third Degree, which behave in the same fashion owing to the fact that it is also a two-part silicone based product. The main difference with this kind of material compared to wax is that you need to measure out equal amounts, mix them and apply them to the skin before it sets (or cures) with a working time of 4-5 minutes. You can cover larger areas by adding additional mixes, as it will bond well to itself. Unlike wax, it does not damage easily.
The only thing you need to remember is avoid contact with latex! Platinum silicones are usually very sensitive, and exposure to latex (in a dried or liquid form) can result in the silicone not curing properly. This is known as inhibition, and usually occurs on a surface someone has touched using latex gloves. As a result, if you do ever need to wear gloves make sure you use Vinyl and not latex!
Step 2 Mixing it up
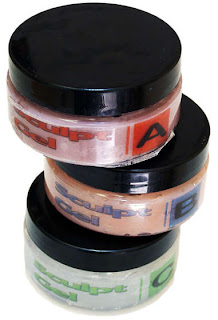
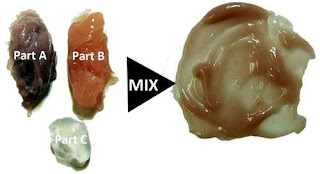
Sculpt Gel comes with three components-clearly marked as parts A, B and C. Parts A and B are the two silicone components which need to be mixed together thoroughly to cure. They have been pigmented two different flesh tones to avoid confusion as to which is which. Part C is purely a softener, and is clear.
Using a clean spatula or wooden tool for each material to avoid cross-contamination, scoop out equal sized blobs of parts A and B onto a clean surface.
You can mix these two parts together and use it as is, or add some part C to soften the mixture further. That is basically it. A palette or a ceramic tile is good to mix on, as these can easily be cleaned and reused using a little alcohol on a cotton wool pad or tissue. Now, let's take a look at how this material is used in a makeup.
Step 3 Apply the mix
To get maximum adhesion, make sure the skin is clean and free of makeup. Use a light astringent toner to clean the skin surface just before you start working.
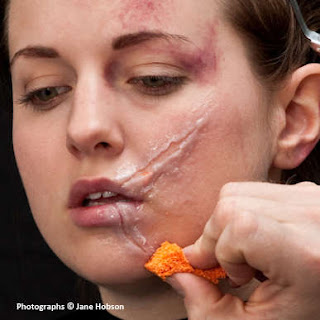
Mix your Sculpt Gel components together; youll only need a small amount of each at any one time. If you want to create something more extensive, mix additional batches and keep adding. You do not want to create a huge thickness in one hit, as the material will start drooping until it sets. Blend out the edges and keep working the surface. Using a blunt tool, start to create a line where you want the laceration to be.
Step 4 Define your details
Lift the edges with a blunt tool to create some more depth. You can pull the Sculpt Gel away slightly, and pack it out in places with tissue, cotton wool or sponge. This way you can create irregular edges without adding more mixes.
Keep teasing out the edges to help them blend into the skin. You can keep working the surface until it ceases to move.
You can always add more if you accidentally pull any edges off.
Step 5 Lose the shine
Use a sponge on the surface just before it sets completely. This will help dull the shine and create a skin texture effect. If you miss your window and it sets before you do this, simply mix a little more A & B, and stipple this over the surface. Speed up cure using a hairdryer on a warm setting.
Whilst I wait for it to cure properly, I add some bruise tones around the eye area to add to the effect.
I then used a little Skin Illustrator to tweak the colour of the Sculpt Gel to match the surrounding skin.
Step 6 Finish your makeup, and add some gore!
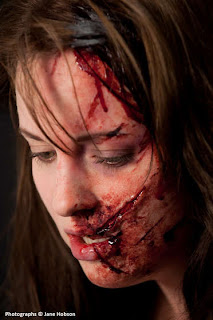
The finished makeup. I used some blood-coloured Skin Illustrator in the cut itself before adding some (purchased) congealed blood and dark scab. Then I dripped some blood into the wound and hairline. You can thicken blood using cornstarch.
I used a tissue, and mopped the blood as you would a real wound in order to create a realistic, messy look. Let the blood drip and run naturally, wiping it into the hair and around the face. Ensure the makeup goes onto the lip and into the mouth, using an edible blood.
Step 7 Finishing touch
I also added a little black tooth enamel (you can use Skin Illustrator) to make the tooth looked chipped. Swill some blood around the mouth, and you're good to go.
A makeup like this can be achieved quickly using a material like Sculpt Gel. Because it is very flexible and unaffected by heat or moisture, it should last reasonably well. Maintain the appliance using more Sculpt Gel or a little medical adhesive like Telesis V.
If the Sculpt Gel mixture is outrageously different from your subjects own skin tone, you can add a little silicone pigment to the mix to intrinsically colour the material. This may be especially worth doing if you have a lot of makeups to do in this fashion on the same person. Silicone pigments will be stocked by sculpture and FX material suppliers-get the smallest amount you can as it is incredibly concentrated and a little goes a long way.
Sculptgel is also useful for repairing and patching silicone gel filled appliance makeups, as well as creating direct-applied effects. I always keep some in my kit.
- Must Have Gadgets for Men
- Top Girly Gadget Gifts for Girly Girls Valentine Days
- Top 10 Home Theater A/V Receivers
- Best 7 Midrange AV Receivers 2011
- Extra Features in Most Wanted Gadgets 2011
- Best Valentine’s Day Gadgets For Valentine Greetings
- Top iPad Accessories for Valentine Gifts
- Unusual and Creative Gadgets Gifts for Valentine Days 2011
- Creative and Unusual Solar Gadgets
- Most Creative Ways To ReUse Old Gadgets
- Super Creative Healthcare Gadgets
- Most Wanted Gadgets For Valentine Day
- What’s The Most Wanted Gadgets And Most Favourite


No comments:
Post a Comment